How to Install MeshCentral on a Linux System: A Complete Guide
How to Install MeshCentral on a Linux System: A Complete Guide
Introduction to MeshCentral
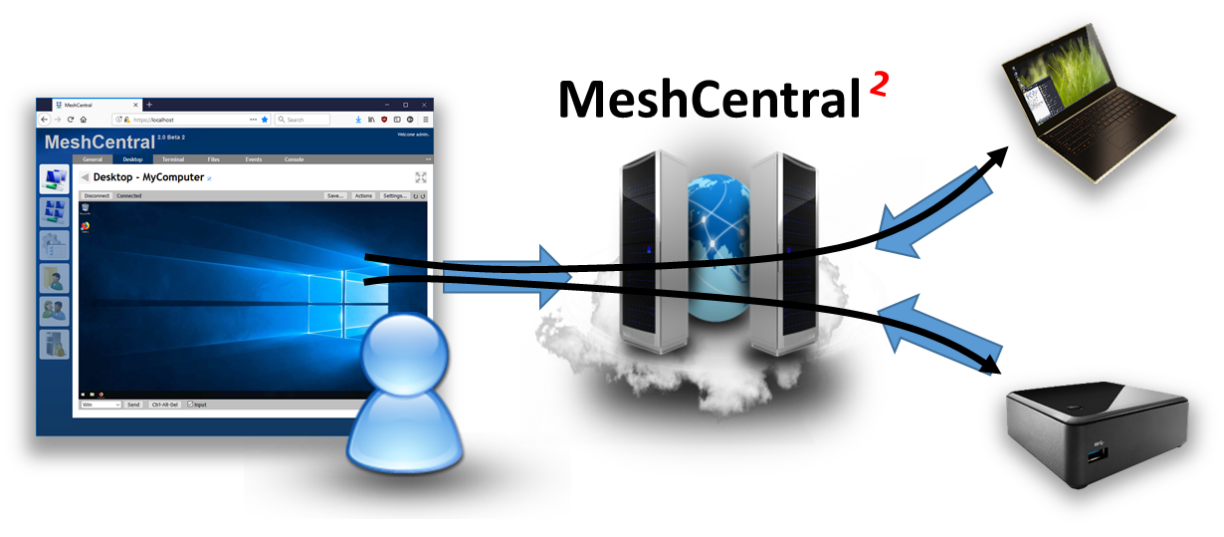 MeshCentral is an open-source remote management software that allows you to control and monitor your computers, devices, and servers. It’s highly versatile, supporting features like remote desktop control, file transfers, monitoring, and much more. MeshCentral uses a web-based interface, meaning you can access it from anywhere to manage your devices.
Whether you're an IT administrator managing multiple devices or a small business owner looking for a cost-effective solution, MeshCentral offers a robust, secure, and scalable platform for device management.
In this blog post, we’ll walk you through installing MeshCentral on a Linux-based system and explain its core features. Let’s dive in! Prerequisites
Before installing MeshCentral, ensure your Linux system meets the following requirements:
A Linux server: This guide works on most distributions (e.g., Ubuntu, Debian, CentOS).
Node.js: MeshCentral is built on Node.js, so you need it installed on your system.
Nginx (optional): To set up reverse proxy and secure your installation.
A Domain Name (optional): If you wish to access MeshCentral remotely, you might want to configure a domain name.
Step-by-Step Guide to Install MeshCentral on Linux Step 1: Install Node.js and npm
MeshCentral requires Node.js to run, so let’s start by installing it. Open a terminal window on your Linux server and run the following commands to install Node.js:
For Ubuntu/Debian systems:
sudo apt update
sudo apt install -y nodejs npm
For CentOS/RHEL systems:
sudo yum install -y epel-release
sudo yum install -y nodejs npm
Verify that Node.js is installed correctly:
node -v
npm -v
Step 2: Install MeshCentral
Now that Node.js is set up, it's time to install MeshCentral.
Create a directory for MeshCentral:
mkdir ~/meshcentral
cd ~/meshcentral
Install MeshCentral using npm:
Run the following command to install the MeshCentral package:
sudo npm install meshcentral
This will install the MeshCentral server in the current directory. Step 3: Configure MeshCentral
Create a configuration file: MeshCentral uses a config.json file for its settings. The installation will have created a default config file in the meshcentral directory. Open it to make any necessary changes:
cd node_modules/meshcentral
nano config.json
Set up a secure password: It’s recommended to set a strong admin password. Look for the "settings" section and configure the "admin" field with a username and password:
    "settings": {
       "admin": "your_admin_username",
       "adminPass": "your_admin_password",
       ...
    }
Save the file and exit the editor.
Step 4: Start the MeshCentral Server
To start the MeshCentral server, run the following command from the MeshCentral directory:
sudo node node_modules/meshcentral
This will start the MeshCentral service on port 443 (HTTPS by default). You can access the web interface by visiting https://your_server_ip_or_domain from a browser. Step 5: Set Up a Reverse Proxy (Optional)
If you’re using a domain and want to set up SSL for secure access, you can use Nginx as a reverse proxy.
Install Nginx:
For Ubuntu/Debian systems:
sudo apt install nginx
For CentOS/RHEL systems:
sudo yum install nginx
Configure Nginx to Reverse Proxy:
Create a new Nginx configuration file for MeshCentral:
sudo nano /etc/nginx/sites-available/meshcentral
Add the following content, replacing your_domain.com with your domain name or server IP:
server {
    listen 80;
    server_name your_domain.com;

    location / {
        proxy_pass http://localhost:443;
        proxy_set_header Host $host;
        proxy_set_header X-Real-IP $remote_addr;
        proxy_set_header X-Forwarded-For $proxy_add_x_forwarded_for;
        proxy_set_header X-Forwarded-Proto $scheme;
        proxy_set_header X-Forwarded-Port $server_port;
    }
}
Enable the Nginx site:
sudo ln -s /etc/nginx/sites-available/meshcentral /etc/nginx/sites-enabled/
Configure SSL with Let's Encrypt (Optional, but highly recommended for security):
Use Certbot to automatically get an SSL certificate:
sudo apt install certbot python3-certbot-nginx
sudo certbot --nginx -d your_domain.com
Restart Nginx:
sudo systemctl restart nginx
Step 6: Access MeshCentral Web Interface
Once the server is running and Nginx is configured (if applicable), open a web browser and navigate to:
https://your_domain.com
or
https://your_server_ip
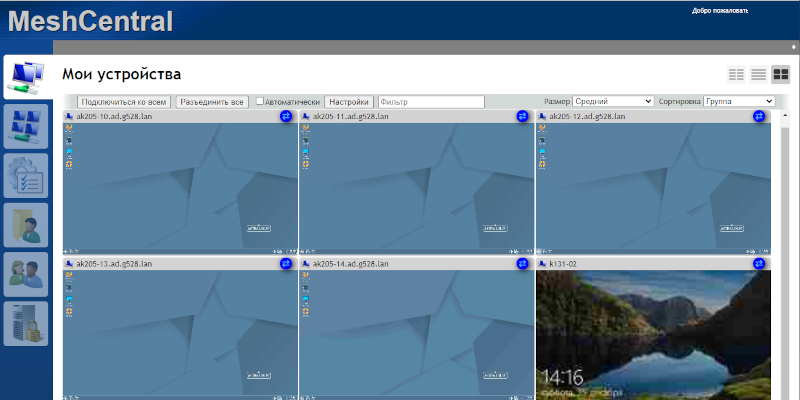
You should now see the MeshCentral login screen. Step 7: Set Up MeshCentral and Add Devices
Login to the Web Interface: Use the admin credentials you set earlier to log in.
Add Devices: You can now start adding devices to your MeshCentral server. Simply download the MeshCentral agent on your devices (Windows, macOS, Linux) and register them to your MeshCentral server.
Key Features of MeshCentral
Remote Desktop: Control remote devices over the internet, similar to tools like TeamViewer or AnyDesk.
File Transfer: Easily transfer files between the server and remote devices.
Multi-Platform: Supports Windows, macOS, and Linux clients, making it cross-platform compatible.
Device Monitoring: Monitor hardware and software status on all managed devices.
Two-Factor Authentication: Enhance security by enabling two-factor authentication for users.
 Conclusion
MeshCentral is an excellent solution for managing devices remotely and securely, with an easy-to-use web interface. By following this guide, you should now have MeshCentral running on your Linux server and be ready to start managing your devices.
Feel free to explore its rich set of features and fine-tune the configuration as needed. Happy managing!